crafts

A Santa tree for me

Santa-Tree

Since my mom died, it’s been a real challenge celebrating the holidays without her. For many years I put up her tree and decorations as well as my own, and was cooking the Christmas dinner at my house so that she wouldn’t have the hassle or the work. After she stopped driving, I even took on the selection and purchase of the presents she gave to family at her request. As much as possible, I wanted to make things easier for her, and make her holidays a happy time.

After she was gone, the idea of putting up my own full-size tree at the holidays suddenly felt like a waste of time and effort, as no one would be seeing it but myself, and there were so many memories associated with the twinkly lights and the smell of pine. But not decorating my house at all felt worse.

I eventually talked myself into displaying at least a small tree, but nothing felt right. Then this year it was suggested to me that starting a brand new tradition might help lessen my sad feelings about missing the old ones.

So I thought a lot about it and this week I decided I would try something completely different. I took several of my favorite Santas from of my collection of about 150, some inexpensive floating wooden shelves from Target, and a metal star, and built a minimalist “Santa tree” on my living room wall.

Planning and installing this gave me something entirely new to do, and I like the idea that I can change or rearrange the Santas if the mood strikes me. Under the “tree” is a small Lane chest where I’ve stacked the Christmas presents. Since this is a work in progress, I might add lights and some greenery later on, but even if I do nothing else, it still feels right.
Advertisement
cross stitch

For Jen & Jim, with love

Jen-&-Jim-Wedding-Cross-Stitch-small

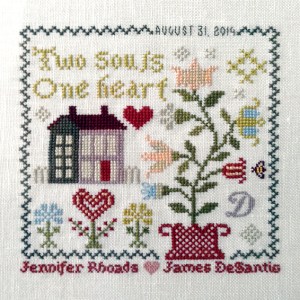
The big family wedding was on Sunday, and yesterday at the post-celebratory get-together I was able to give my lovely niece and her wonderful new husband the small extra gift that I had stitched for them.

To my adaptation of the Blackbird Designs “Heart in Bloom” chart (I adjusted the border, reworked the letters and changed some of the floss colors), I added their names and a large capital to highlight their newly-shared last name, plus I included their wedding date, of course. I think that the kids appreciated that I made them something from the heart.

cross stitch

Prairie Schooler Queen Bee

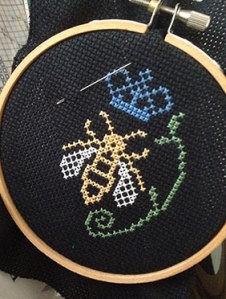
Queen-Bee-in-progressAll this talk about bees caused me to remember that I had a little Prairie Schooler Queen Bee mini-card in my collection. I decided to start it on some leftover, black 14-count Aida cloth from my stash. Large weave Aida is not my favorite fabric as it is so stiff and rough, but it’ll do fine for this small project, which I think will end up as a nice little egg-shaped pincushion. The photo shows how much was stitched in just one sitting, I hope to finish it this weekend.

cross stitch

Speaking of bees

IMG_5669

As I mentioned in my last post, my name Deborah means “bee,” so I always like to add a bee or two as tiny accents to my stitching projects when possible. I especially use bees as my signature on pieces that I am personalizing as a gift for someone and where signing with my own initials just won’t work. Hence I have a Pinterest board devoted to “Small Cross Stitch Motifs,” where I have collected several tiny cross stitch bee images (amongst other things) from which I can choose.

I often use the simplest of designs, usually because I have only a very tiny area left to fill (sometimes only a 6 stitch width!) on any project, and I much prefer primitive-style or very stylized designs for my pieces. But I am always on the lookout for any type of tiny cross stitch bees that might be useful in the future!

cross stitch

Heart in Bloom

IMG_8157

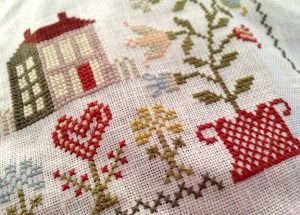
I’ve finally finished Blackbird Designs “Heart in Bloom.” Such a long time to complete such a small project!

I really enjoyed stitching this because it is a gift for two people whom I dearly love. I stitched the names of the recipients at the bottom under the border, which I revised to better suit my needs, and I also added a tiny bee as my signature to the right of one of the flowers. I like to add bees because my name means “bee,” and try to include one in every project, if possible.

I’ve purchased a lovely square frame from Michael’s Crafts for this, but am not completely certain about the look, and so will wait until the weekend to decide. Overall, though, I’m quite happy with the way this little project turned out.

charts · cross stitch

A little progress

IMG_7499

I finally found some time this past week to put in a little more effort on my current project, “Heart in Bloom.” Per usual, I find I’m changing the floss colors a bit as I go along, and am making some design adjustments to better suit my idea of balance. The actual chart is  small, so the changes I am making won’t affect the overall size very much at all, and I doubt anyone but the designer would notice the revisions.

I almost always find it hard to stitch a chart exactly as it is shown, I keep wanting to fiddle with it. I suppose that’s the graphic designer in me coming out. I get a lot of pleasure out of adapting what I see to make it better suit its recipient and my own sense of color.

I’m glad that I chose a small design because the arthritis in my right hand has been slowing me down of late. It sometimes prevents me from stitching entirely — gripping that little needle is an impossible challenge some days. However, my “wear and tear” arthritis is quite mild compared to that of several people I know. Most of the time I don’t even think about it, it’s only when I go to turn a key in a lock or button a shirt or grip the handle of a coffee cup that I am reminded that there are some little things I just can’t do as well as I used to be able to do. All I can say is that ibuprofen is my friend!

DIY · tutorial

DIY iPhone 5 stand

iPhone5-DIY-StandI really like to Facetime with my long-distance family members, but I found that holding my phone up in a good position for the duration of a lengthy call was a little tiring. Setting my phone on the table for a call or propping it up against some books didn’t seem to work very well, either. The phone was always at too low of an angle for comfortable viewing, or it would eventually slide awkwardly out of position, or both. What I really need was a hands-free solution, and preferably one costing next-to-nothing. (Can you sense just how much I like the concept of DIY + free?)

So I looked around online for inexpensive DIY ideas for a sturdy, flexible, hands-free iPhone stand, and few days ago I found what looked like the perfect tutorial here. This showed how easy it might be to make exactly what I needed for nothing, out of spare parts already laying around my house. I knew I had to give it a try.

Following the very simple instructions, I cobbled together part of an old, broken gooseneck lamp, a 1/2-inch hex nut and a spare suction cup. Well, to be completely honest, the end result wasn’t completely free, I did spend 30 cents for the hex nut at my nearby Lowe’s hardware store.

After the E-6000 multi-purpose adhesive (my new favorite stickum) had completely dried, everything screwed together easy-peasy and exactly as shown in the video, however I found that the suction cup had trouble maintaining a good grip on the lightly textured back of my iPhone 5. Basically, because of its non-slick surface, my phone would eventually fall off of the suction cup mount after about two minutes. This was certainly not acceptable.

I pondered this problem for awhile and realized that a new or stronger suction cup was probably not the answer, I needed an even more secure mounting. Then I got the idea of cannibalizing one of my old and now useless iPhone 4 cases by trimming off the upper edge so that the taller iPhone 5 would fit inside. I trimmed the old case with my tin shears, made sure to sand off any rough edges with a metal file, and then just glued the suction cup connector to the back of the truncated case, et voila! My iPhone 5 easily slid right into its new and very secure holder.

Happy to report that my new phone stand works beautifully! I can adjust the phone for either landscape or portrait configuration and the height is just perfect for using Facetime. The only thing I haven’t done yet is cover the back of the case where the suction cup and nut are attached with some black felt from my stash. As suggested in the video, this would give my new stand a neater look from behind. But hey, no hurry, I don’t look at the back anyway.

DIY

Algebraic! magnets

AT-magnetsHere are some cute little “Adventure Time” magnets that I made for my niece’s fridge. She and her fiancé are big fans of the TV show on the Cartoon Network and I thought they might get a chuckle out of receiving a set of these for use in their kitchen.

I think that’s it for my magnet-making mania for right now. There’s only so much Mod Podging one can do before sticky finger satiation sets in! I’m going to use the rest of the paper that I punched into 1-inch circles for envelope seals.