DIY · tutorial

DIY iPhone 5 stand

iPhone5-DIY-Stand
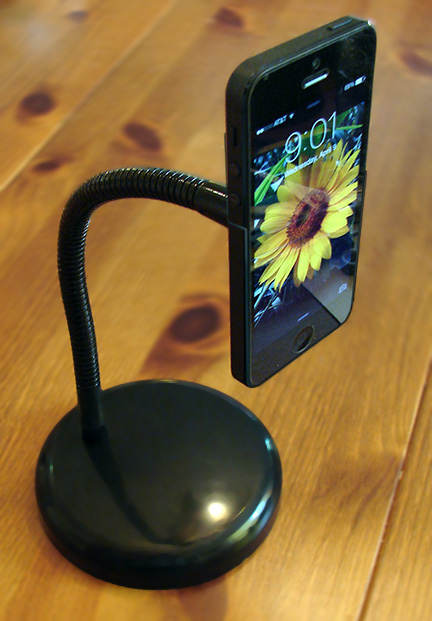
I really like to Facetime with my long-distance family members, but I found that holding my phone up in a good position for the duration of a lengthy call was a little tiring. Setting my phone on the table for a call or propping it up against some books didn’t seem to work very well, either. The phone was always at too low of an angle for comfortable viewing, or it would eventually slide awkwardly out of position, or both. What I really need was a hands-free solution, and preferably one costing next-to-nothing. (Can you sense just how much I like the concept of DIY + free?)

So I looked around online for inexpensive DIY ideas for a sturdy, flexible, hands-free iPhone stand, and few days ago I found what looked like the perfect tutorial here. This showed how easy it might be to make exactly what I needed for nothing, out of spare parts already laying around my house. I knew I had to give it a try.

Following the very simple instructions, I cobbled together part of an old, broken gooseneck lamp, a 1/2-inch hex nut and a spare suction cup. Well, to be completely honest, the end result wasn’t completely free, I did spend 30 cents for the hex nut at my nearby Lowe’s hardware store.

After the E-6000 multi-purpose adhesive (my new favorite stickum) had completely dried, everything screwed together easy-peasy and exactly as shown in the video, however I found that the suction cup had trouble maintaining a good grip on the lightly textured back of my iPhone 5. Basically, because of its non-slick surface, my phone would eventually fall off of the suction cup mount after about two minutes. This was certainly not acceptable.

I pondered this problem for awhile and realized that a new or stronger suction cup was probably not the answer, I needed an even more secure mounting. Then I got the idea of cannibalizing one of my old and now useless iPhone 4 cases by trimming off the upper edge so that the taller iPhone 5 would fit inside. I trimmed the old case with my tin shears, made sure to sand off any rough edges with a metal file, and then just glued the suction cup connector to the back of the truncated case, et voila! My iPhone 5 easily slid right into its new and very secure holder.

Happy to report that my new phone stand works beautifully! I can adjust the phone for either landscape or portrait configuration and the height is just perfect for using Facetime. The only thing I haven’t done yet is cover the back of the case where the suction cup and nut are attached with some black felt from my stash. As suggested in the video, this would give my new stand a neater look from behind. But hey, no hurry, I don’t look at the back anyway.

Advertisement
paper · tutorial

German folded paper stars

Folded-StarOver the years, my eldest sister has gifted many of her friends and family with her handcrafted white, red and green German folded paper stars for their Christmas trees, so I was delighted when I learned that she has also decided to make golden stars to add to the table decorations at her daughter’s upcoming August wedding. The gold stars are designed to complement my niece’s choice of wedding colors.

Although I’ve done other paper folding projects, I’ve never made any stars like these; however, the excellent video tutorials on the Grateful Prayer Thankful Heart blog show how to make two-tone ones, so I may yet give it a try just for fun.

DIY · tutorial

Happy Valentine’s Day!

Heart-BookmarkI went looking for a cute and simple project for Valentine’s Day and found a tutorial for these heart-shaped origami page markers at the HowAboutOrange blog. How sweet!

These hearts are a quick and easy fold and slip neatly over a page corner to mark your place in any book. Mine is holding my spot in “The Private Patient,” a crime novel by my favorite UK mystery author P.D. James.

You only need half of a square sheet of paper for these, and I’d recommend using a 5-1/2” x 2-3/4” size piece or smaller. I started with a larger sheet and my first heart came out very pretty, but huge! I think larger hearts might make lovely Valentine’s place cards on a table, though. You could just write your loved ones’ names across the hearts and set them in the middle of your place settings.

One more note: although there are not a lot of folds to these, which allows you to use just about any type of  paper, for the neatest results I’d suggest using the thinnest paper you can find. I actually printed my little red and pink dot pattern onto some lightweight writing paper from an old pad that used to belong to my mother. This makes my little heart bookmark a sweet reminder of her as well.

DIY · tutorial

DIY Pinboard attempt #1

IMG_7241I have a sort of love/hate relationship with corkboard bulletin boards. The idea of them greatly appeals to my organizational DNA, but they never really live up to their potential of making my life tidier, nor do they ever look quite as good in use as they do in my imagination.

So when I needed to install some new shelving in my office, I was pleased that I could finally remove the beat-up bulletin board that had previously been taking up so much valuable wall space. My new cubicle cubbyholes are now happily creating order out of the chaos of my assorted knickknacks, and the old bumpy bulletin board got demoted to a dark closet.

Yet every time I opened the closet door, that poor old bulletin board, now denuded of mementos, looked so raggedy and sad. I felt so sorry for it!  I decided to re-purpose it and give it a second life as a padded pinboard for my bedroom. To that end, I did some online research and bought about $5 worth of remnant fabric and some flower-heaedd upholstery tacks at Jo-Ann Fabrics and went to work with leftover batting and ribbon from my stash and my staple gun.

The final result was sadly not as spectacularly transformative as countless online DIY tutorials had promised. Oh, I did a neat enough job and the project came together easily enough, but the overall effect of the new board hanging on my wall was just, well – blah. Upon reflection, one problem was that I used only one layer of batting, when perhaps two would have given the project more “oomph,” and I’m thinking that a wider ribbon might have been a better choice.

The tacks went through the cork and backing easily enough, but securing them presented a problem I had not anticipated. A second layer of heavy cardboard as a base might have been helpful in improving their overall stability. Luckily, I have cardboard, extra batting and plenty of leftover ribbon in my cupboard, so I may just try a re-do of the project this weekend. I’m determined to give that sad little bulletin board a new lease on life.

cross stitch · finishing · tutorial

Mason Jar Pincusion

IMG_7233For this personalized pincushion project I used a small 8-ounce mason jar because that’s what I had on hand, and because I thought it would be the perfect size for storing little things, like a few skeins of floss for a small project. Of course, I could have reused any size mason jar from my cupboard stash, as long as the jar came with a ring and lid separate.

I started with the Stacy Nash Primitives “Monogrammed Pinkeep” chart which I reworked slightly to fit my widemouth jar’s 3” opening, and I ended up adapting it to a 45×45 stitch design that measured 2-7/8×2-7/8” overall flat. I wanted a puffy-looking pincushion, and so figured that this size would fit perfectly inside of the jar ring and once the stuffing was added would pop up just enough to create a nice clean border all the way around.

comboThis I stitched on a remnant of 32-count oyster linen using two strands of DMC floss (926 & 610) over two threads. I chose a lighter weight linen because I knew I would need to screw the lid back onto the jar in the end, and a thicker fabric insert would make that next-to-impossible.

Once the actual stitching was completed, I trimmed my linen to the size of a 6” circle. Using a regular sharp needle and doubled thread, I basted all the way around and about a half-inch inside the edge, and pulled the thread to gather the linen slightly. I had to double the thread to make it strong enough to gather the material without breaking. I don’t think this would work with Aida cloth, as that is too thick and stiff, but the linen I used was just fine.

I stuffed the circle with enough polyfill to make a nice semi-firm cup shape. I like my crafts projects to look perfect, or at least as perfect as I am capable of, and it actually took quite a bit of trial and error to get just the right amount and make absolutely sure that there were no lumps in the stuffing! When I was satisfied with the look and feel, I set the jar lid top in place atop the stuffing and gathered the material tightly and evenly around it, tying off the threads.

Making sure that my cross stitch design was perfectly centered, I ran hot glue under the gathered fabric edge to tack it down to the lid. Using the inside of the jar ring as a template, I cut a 3” circle of felt which I hot glued into place to cover the gathered ends, and then just screwed my pretty new lid onto the jar!

I had everything on hand, so this project cost me nothing, which was a sweet little bonus.

Here’s what I used:
8-ounce widemouth mason jar with ring and lid
Cross stitch design sized to fit within a 3” lid opening
A little polyfill
Small circle of felt (size traced from the ring)
Scissors
Hot glue gun